Microsoft UserVoice: let YOUR voice be heard

One of the concerns that many people have is that it is difficult to be heard by the (large) companies that supply their software (or hardware). And it is true that in many cases it isn’t possible. Many companies have different ways of hearing the customer, and some companies listen better than others. Of course this is sometimes misconceived by the customer when they reach out and there is no response directly. The company that I work for is always listening very heavily (through user forums) and we try to respond as good as possible but on the other hand we will never submit to something requested if it is not planned or coming soon. And we are certainly not the only ones working like that.

For larger companies (such as Microsoft) it is even more difficult to respond to everything or to review every request. They (and us) have to think about the bigger picture. The more a specific feature is requested, the more likely it will make it into the product.

Microsoft is starting a new initiative that will make it much easier for you to submit feedback on different solutions they have. I think that creating one single place to bring all the feedback together is good and it will make things easier both for you and for Microsoft.

So the time is now, use your power and start submitting feedback, or upvote others ideas that you would like to see also. The power is in your hands!

Windows Server: http://windowsserver.uservoice.com/forums/295047-general-feedback

Clustering: http://windowsserver.uservoice.com/forums/295074-clustering

Storage: http://windowsserver.uservoice.com/forums/295056-storage

Virtualization: http://windowsserver.uservoice.com/forums/295050-virtualization

Networking: http://windowsserver.uservoice.com/forums/295059-networking

Nano Server: http://windowsserver.uservoice.com/forums/295068-nano-server

Linux Support: http://windowsserver.uservoice.com/forums/295062-linux-support

image

Happy submitting Winking smile

Hyper-V Bear

2015 Microsoft MVP Virtual Conference

If there is something that MVP’s like to do, it is sharing content. This year, US MVP’s have teamed up (together with Microsoft) to deliver a virtual conference with lots of interesting stuff to watch.

First, the bad news… It is a US MVP event so the hours are maybe not that interesting for other area’s in the world. On the other hand, I am sure you still can find a few sessions that you can watch at (more or less) normal hours and some of us might say this is an advantage because that means they can watch outside the office hours…

The dates: May 14th and 15th

Time: 8am – 6pm PT (Pacific time)

There will be around 95 sessions in total divided over 5 tracks. Keynote (all tracks) will be delivered by Steven Guggenheimer, corporate VP at Microsoft

The tracks itself are IT Pro, Developer, Consumer, Latam (Spanish), Brazil (Portugese)

Each session will be around 50 minutes with a moderator to answer Q&A.

You can find the full agenda here: http://mvp.microsoft.com/en-us/virtualconference-agenda.aspx

There are certainly a lot of interesting session with fantastic speakers so it is certainly worth checking it out.

More information:  http://mvp.microsoft.com/en-us/virtualconference.aspx

To register: https://managedevents.eventbuilder.com/event?eventid=h4p0x7

Enjoy the free sessions!

Hyper-V Bear

Microsoft wants to hear your voice!

Did you ever wanted to tell something to Microsoft about Hyper-V? Never had the opportunity or you don’t believe they listen? Here is your change!

The following survey: https://www.instant.ly/s/G5bPn?s=cp is being performed by the Hyper-V PM team itself. In their efforts to improve Hyper-V, they ask you some questions to see what is most important and most used by YOU in your environment. I can only assume that this will lead into more development time for those specific features Smile

Only problem… Don’t open the above link in Chrome… The drag-and-drop functionality of the survey doesn’t work in that browser. IE works fine (haven’t tested other browsers…)

It only takes 5 minutes so go ahead and fill-in the survey!

Cheers

Hyper-V Bear

Extending the Windows Server Technical Preview

For those of you who are playing and learning about the next version of Windows Server (aka Windows Server Technical Preview) it might have come as a surprise that you suddenly started to receive below message.

image

The problem is that Microsoft has not yet delivered a new build and while we are eagerly waiting for that, we also need to be  able to continue working in our labs. A server that is rebooting every few hours isn’t that convenient at that moment. Luckily, this weekend, Microsoft came to the rescue (or as some famous blogger said it this weekend… the cavalry is there…). During the weekend, they delivered a patch that will extend the trial period. The patch can be downloaded from here: http://www.microsoft.com/en-us/download/details.aspx?id=46447

A few notes on this patch.

First you might notice that it states you can continue using the current build until the next preview is available in May. At least that gives us more or less a data when to expect the next build.

Second, you can read in the installation instructions that you might need to use the DISM command (as seen below) in case you are using Hyper-V Server or Server Core and installed it from the ISO. This process can be seen below

image

image

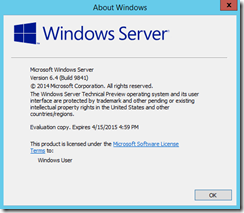
Unfortunately, that didn’t do the trick. After rebooting (and rebooting, and rebooting…) I kept receiving the expiry message and when checking winver.exe I still could notice that my expiry date was 15 april 2015.

image

After a lot of emails exchanged on the MVP distribution lists where it was confirmed that lots of people had the same issue, although some of them had no issues at all the program managers of Microsoft confirmed the issue, and delivered us the solution.

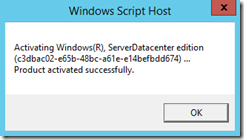
Simply run slmgr /ato in a command prompt to fix it. This will simply reactivate your license key.

image

image

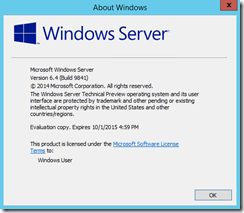
Reboot again, and your problem is solved as you can see in the next screen

image

One final note, depending on the installation with the ISO or VHD, you can retrieve your license key here: http://www.microsoft.com/en-us/evalcenter/evaluate-windows-server-technical-preview (The ISO doesn’t need one, the  VHD does)

Happy continuation of preview testing Winking smile

Hyper-V Bear

Installing & Configuring Server Manager on a Windows 8.1 machine

Let’s take a small break from configuring the core server and talk quickly on how to install Server Manager on a Windows 8.1 machine. We will go deep-dive on this tool in the future as it should become your tool for your daily work, but for now I just want to get it installed and quickly configured with one server so I can do some basic tasks. By the way, this tool can do A LOT

We talked already a lot about remotely managing our Windows Server 2012 R2 core servers. One of the things you need to learn (and yes, it requires some adjustments from yourself to learn it) is Server Manager. The thing with Server Manager is that once you get used to it, you actually have no idea how you used to do your work. It is rather good (there is always room for improvement but hey…) and with the correct configuration, you will be able to work much faster.

When you have a Windows 8.1 machine, it comes by default without server manager. And that is even a logical choice. After all, the typical windows 8.1 user does not need to work with servers and server roles so there is no reason at all to include it by default. So you will need to install it yourself (or include it in the System Administrators endpoint image…)

Let’s look at how I made my workstation into a powerful Server Management tool.

First, download the Remote Server Administration Tools for Windows 8.1. Note that it comes in a 32- and 64-bit version so you need to download the correct version for your workstation.

Running it in silent mode

For those that want to run the installer in silent mode, this is not a problem at all. So if you are using System Center Configuration Manager or any other tool that provides you with distributed software management, you can add it in there and distribute it automatically. Since it is a windows update standalone installer, you can use the default parameters that exist. To figure out what these parameters are, you can just type Windows8.1-KB2693643-x64.msu /? and you will get a popup that shows you what parameters are possible

clip_image002

For this specific one, you can just use Windows8.1-KB2693643-x64.msu /quiet /norestart

Or you can just double-click it and install it manually so you actually see when it is finished installing.

Note that you don’t need to restart afterwards, but as always, make sure you run Windows Update afterwards to have the latest updates J

What do we have now?

Basically, I just made my laptop a powerful remote administration machine. We will go very deep on server manager later on, but for today, I only wanted to do two little things.

1. Install it and add one server to my server manager

2. Make sure I can use remote PowerShell to that server.

Installing Server Manager installs also automatically administration tools and PowerShell modules that come with those tools. Since we are on a quest to administer Hyper-V core, I specifically wanted to have that PowerShell module on my laptop, for working remotely on my servers.

But there is much more installed. All tools and notes (and support matrix) can be found here: http://support.microsoft.com/kb/2693643/en-us

As said, we will work with them later on.

Adding a server to Server Manager

First you will have an empty tool. There will be no servers connected to it. If you use server manager on a server, the local server will be added by default.

clip_image004

Press the Add other servers to manage or go to manage > Add Servers

clip_image006

Now you can start adding servers to Server Manager. If your computer is domain joined to the same domain as your servers, you can use this method. As you can see, my workstation is not domain-joined so I can use the DNS or Import option.

clip_image008

After typing in the DNS name or IP-address I can now add this server

In my case, the first thing you will see is that the server is added but that there will be a red flag immediately. This means something is wrong

clip_image010

The solution in my case is rather easy. Since I am using a workstation that is not domain-joined, my local user is not known by my server so I have no access to the server

clip_image012

By right clicking on my server and going to Manage As… I can type in the credentials to manage that server.

clip_image014

Note that it might take some time before you see the effect. The reason for that is simple. Server Manager is not a real-time tool. So it takes some time to refresh the data in the window. But simply pressing the refresh button solves that fast.

It still doesn’t work!

Depending if you used this computer to manager servers before, it is possible that it still doesn’t work. Don’t forget that I am using a non-domain joined workstation. In a domain environment, this is not necessary.

If you receive this notification:

Error <nameserver>: Configuration refresh failed with the following error: The metadata failed to be retrieved from the server, due to the following error: The WinRM client cannot process the request. If the authentication scheme is different from Kerberos, or if the client computer is not joined to a domain, then HTTPS transport must be used or the destination machine must be added to the TrustedHosts configuration setting. Use winrm.cmd to configure TrustedHosts. Note that computers in the TrustedHosts list might not be authenticated. You can get more information about that by running the following command: winrm help config.

That means PowerShell to the rescue again!

Open a PowerShell window on your workstation and type in the following command:

Set-Item wsman:\localhost\Client\TrustedHosts <nameserver> -Concatenate –Force

clip_image016

And now I have management over my server

clip_image018

On to the next step

Now that I have Server Manager and the additional tools and PowerShell modules on my workstation, I can start doing some remote work. In the upcoming weeks and months I will show lots more of Server Manager and its capabilities. But for now, I just wanted it installed, get one server in it and have my PowerShell modules ready so I can take the next steps in our series… Configuring my core server with PowerShell… Remotely.

Till then

Hyper-V Bear

Starting with core… Or full UI?

This is a question I get a lot, should I start with windows server core? Or should I install it with a UI, configure it, and then go to core. As always in Tech world… It depends. If you can deploy machines with the right settings (domain join, network settings, firewall settings, rdp settings, storage config…), in other words, the baseline image that matches your environment, then why should you bother using the UI in the first place. After the initial deployment, you connect with your remote server manager and tools (that’s a topic for later on…) and you are good to go and can continue doing what you need to do.

Unfortunately, not everyone has that possibility and today there are still a lot of companies that need to deploy manually, or have a very basic baseline and still need to configure additional settings depending on what role the server will take. In that case, unless you like to configure everything through commands and PowerShell, I advice to start in UI mode.

As I said in my previous post there is the possibility to switch to another mode. Since server core is kind of the underlying server stack and the MinShell and full UI are more or less roles on top of that, you can remove (or add) those roles very easily.

So let’s go back to our example. We have deployed windows server with the UI using your preferred deployment method, you have added the Hyper-V role on top of it (although this can be done remotely also…) and configured the storage connections, network connections and everything else you need to do. Now the only thing left to do is patching and your server is ready for use…

OK, I don’t agree on the patching part… As we said in the previous post there will be less patches when you are running in Core mode, so why go through the trouble of patching an entire server while you can do it when it is in core mode so you need to do less patching and loose less time. I’ll come back to that. First, I want to go to core with my full-blown server.

There are two ways to remove these roles… (There are actually three, you can also use DISM but I’ll skip this one…). You have the UI way, and the PowerShell way. Note that you only can use the UI way when you are actually using a UI, so it is certainly better to learn how to do it in PowerShell.

The UI way

For the UI way, it is very simple. Go to Remove Roles and Features (from Server Manager for example), select your server, go over the Server Roles and when you  are at the Features page of the wizard, you will find User Interfaces and Infrastructure

image

Deselect Graphical Management Tools and Infrastructure and Server Graphical Shell. Note that it is perfectly possible that you will get a warning that certain other features and roles need to be de-installed also. If you installed the Hyper-V role and the tools, the tools need to be removed. If you have PowerShell ISE running, it will need to be removed… And there are  other features, tools and roles that can’t run on a core server. In that case, review the box very well and make sure you are not removing a component that is actually needed on that server. In that case, this server is not meant to be core Smile

Finish the wizard, know that it will reboot afterwards and then you are in core mode.

The PowerShell way

For the PowerShell way, it is actually also very simple.

Import-module servermanager
Uninstall-windowsfeature -name Server-GUI-Mgmt-Infra,Server-GUI-Shell
RESTART-Computer

Note that you probably won’t need to use the Import-Module CmdLet because you probably will run this directly on the server. And the last command is necessary to restart the computer, but I am sure you know other ways to do this Winking smile

But let me give some more background. To know what kind of roles and features are installed, you can simply type in a PowerShell window the  command Get-WindowsFeature

image

As you can see in the screenshot above, you get all the roles and features listed with upfront some sort of checkbox. When there is an X between the  brackets [X] it means the role / feature is installed. So when I scroll down I will find this:

image

In this screenshot you see that Server Graphical Shell and Graphical Management Tools and Infrastructure is installed.

To make it a bit more easier, we can search more granular and use

Get-WindowsFeature -name *GUI*

image

And now for the updates

After the restart, we have our core server running… Now on to the patching part as I promised. I am sure that many of you will have a favorite method of patching, but in case you want to do it manually…

I could say PowerShell again, but unfortunately, for some dark reason MSFT did not put this functionality in PowerShell (yet?). Now you can download this module https://gallery.technet.microsoft.com/scriptcenter/2d191bcd-3308-4edd-9de2-88dff796b0bc and use PowerShell anyway, but when you are a bit like me, you don’t like additional stuff being installed on a server so I like to use other methods.

But in the end, it is still very simple. Open a RDP connection to server core, and type in sconfig in the command prompt

image

Press number 6

image

Choose A for all updates or R for recommended updates and let the script do its magic.

image

Now you can choose which updates  you want to install… Choose A for all updates, N for no updates or select a specific one by using S

image

Finally you will be able to reboot after the installation.

Enjoy

Cheers

Hyper-V Bear

Hyper-V Best Practices book

I have received the invitation to review a book about Hyper-V written by Benedict Berger, a well-known and respected Hyper-V MVP, blogger and speaker. His book is called Hyper-V Best Practices and published by Packt publishing. From time to time, I like to open a book about a technology, but most off the time I find myself looking at articles or blogs to gather the information I need. The reason is very simple, a book about technology starts mostly with the basic introduction of the technology, some explanation, how to install and then some basic configuration and how to work with the solution. Don’t get me wrong, I think these books have lots of value for a large amount of IT professionals out there. But hey, I am Hyper-V bear so my only interest lies in Hyper-V (OK, and System Center and Azure… And Veeam of course Winking smile). This means that I am not interested in starting information, and am always looking for specific, deep-dive information.

But this book drew my attention rather quickly. To start with (as he says himself in the book), this book isn’t intended for someone who wants to start with Hyper-V. This book is intended for someone who has at least already some basic experience with the solution. Instead of the basic information, it goes into depth on various topics so if you have never worked with Hyper-V, you will probably be lost with this book rather fast. (Don’t worry, start playing with Hyper-V and grab it afterwards again Smile)

But even if I think it is not the traditional book, it does follow the classic approach of any other book. It starts with a chapter on installation, talks about HA scenario’s, Backup and DR, Networking and so on. The big difference is that it is FULL of best practices that the author learned from the field, from experts, even from the product group that builds Hyper-V. And besides those best practices, he also delivers a lot of PowerShell commands with it for illustration. In fact, it is rather rare that he uses the GUI screenshots to explain how something works. He works with PowerShell as much as possible. Should that scare you? Absolutely not. As you know, this bear is a big fan of core installations, and all the references in this book can be very handy when working with core installations. But for those who are not going to work with core installations (and why not? Winking smile) they will be able to leverage that also. Creating a set of PowerShell one-liners or small scripts is always handy.

Another great thing about this book is that the author never takes something for granted. Instead of starting on how the installation works (and how you can modify it with unattended scripts) he stresses out that you need to do your sizing right, and that there are tools that can help you with that. Basically a task everybody should have done before the installation, but something that I have seen too much in the field that it is not done upfront, with all the consequences afterwards.

After reading the entire book, I can only say that there is certainly information for every Hyper-V administrator. From advanced networking concepts and their configuration (but also the basic ones) to management to storage configurations (and the  different ones that there are)… There is lots of interesting information to find, and the depth is certainly interesting for many IT professionals out there. And even if you already know everything, it can be a good reference book also for your PowerShell cmdlets (again, I am a bear so I have a bear memory Open-mouthed smile)

Here is the link: https://www.packtpub.com/virtualization-and-cloud/hyper-v-best-practices

Have fun,

Hyper-V Bear

To core or not to core… Should it be a question?

If you are using Windows Server 2012 or higher, why not go core? I understand that server core has started badly with windows server 2008 R2. The idea itself was great, but it was too much of a hassle for most IT administrators. The problem already started by installing the operating system where you had the choice of an installation with UI, or one without. If you chose the latter, then you had to do configure everything in PowerShell or by the commandline. Actually, most needed to be done through the commandline as PowerShell support wasn’t that big yet before Windows Server 2012.

But probably the worst was the fact that you weren’t able to do everything remotely, and the server manager that existed in 2008 R2 wasn’t really something you could call a success. As a result, many have experimented with it, not many have actually implemented it. The main issue? Not the configuration, but when something went wrong, and you needed to troubleshoot (and under pressure) it was very difficult to get the job done in a timely manner (what was that command again to do that? How can I view those specific logs when I have no remote access to my machine?…)

Fast forward to 2012 and 2012 R2. Not only did server manager improve a lot (and got overhauled completely) but now you are also able to switch between UI, MinShell and Core. Wait, what? MinShell? Before I start talking about switching, you need to understand that there are four options in Windows Server 2012 and R2. Let’s have a look at them:

  • Core: Is literally the baseline of your server installation. It comes with a command prompt, and the possibility to start a PowerShell session.
  • MinShell (aka Minimal Shell): Has the baseline also, but comes with a limited amount of management tools such as server manager but not everything is available. You still have benefits over the UI version (see later) but less than the Core version. On the other hand, you can locally use some tools when necessary…
  • Server Graphical Shell (aka the GUI version): The full blown server version with all the management tools and UI’s as you are used to.
  • Desktop Experience: The UI version and the full desktop experience, like you would be running windows 8 (server 2012) or windows 8.1 (server 2012 R2). This is only used in RDP desktop configurations or VDI implementations. I don’t really see another good reason for installing a desktop experience on servers running other workloads.

Benefits?

If you want to convince someone to run server core or minshell, you need to have some good reasons why you would want to loose the entire UI (or partly in case of MinShell) functionality. The reasons are very simple, and very convincing…

  • Resource consumption: Since it is stripped down from all unnecessary components, the system will have more resources available for running the actual workload instead of wasting those to something that is not necessary. With core you will have more resource savings than with MinShell, but even then you save on resources compared to the UI. The footprint is also smaller with less OS files on the disk.
  • Security: Because a lot of components are away, the attack surface becomes smaller. In fact, we all know patching very well because of the many vulnerabilities in (for example) Internet Explorer. With no IE on the box, you have less attack surface and the risk of 0-day and other security holes are greatly reduced.
  • Reduced management: Less patching to start with, but also less components means less troubles and therefore less troubleshooting.

But management is still harder!

Yes, I know, the moment you loose the UI, the management becomes harder. But you can do almost anything remotely with the new RSAT tools and Server Manager, so that is not an issue anymore. On top of that, because it will force you NOT to RDP to the box anymore, you will save resources again. Double win Smile. But I do realize it isn’t that easy to start with. In fact, the first couple of days I worked with Server Manager, it annoyed me having to learn a complete new way of working, but after that, I honestly can’t say I want to go back to the previous way of working. Again…

But as stated in the beginning… What if there is a problem, and you can’t use your remote tools anymore. Then it is up to you and your commands. Let’s answer that question a bit further.

Workloads?

Does every workload run on core? No, unfortunately not. But that doesn’t mean that you shouldn’t use it for other workloads. Almost every core infrastructure service of Microsoft is supported, and the latest SQL server is supported also. For more information, you can go to http://technet.microsoft.com/en-us/library/hh831786.aspx

But the workload that interests us is Hyper-V of course. (Although I don’t see a good reason to run Hyper-V in core mode and then the workloads on it in full UI mode… But that’s another discussion

But management is still harder!

Yes, indeed, and as promised, I will write a bit more about that. To start with, I always make sure that I have my list of commands and PowerShell cmdlets with me. In my case I use OneNote that is shared over all of my devices, but it can be on a piece of paper, word, whatever you prefer. In case of an emergency, I can always use that ‘cheat-sheet’ to do my work. Let’s be honest here, I am a Bear, and every command that I don’t use on a daily basis I forget. And that is exactly why I have that cheat sheet Smile

And that is what I will start to share with you all in the upcoming posts… All of the things I need to successfully manage core, specifically Hyper-V core, and even much more. The next post we will start with the fact that you can switch from GUI to Core (or MinShell inbetween) and vice versa very easily, although it will require a reboot. Another great thing that came with 2012 and later and wasn’t in 2008 R2

Conclusion

To run core or not should not be a real question anymore. The only question you should ask is whether you can run the workload in core mode or not. If it is possible, then you should. Is management a bit harder? Certainly, but with the right tools and the right set of commands and cmdlets available, you should have no issues with that. And that is what we are going to provide…

Till then

Cheers

Hyper-V Bear

Hyper-V Reporting Script!

My first blog post and it is not even something specific from myself… But sometimes you just have to write about something you discovered on the web, and that is just fantastic… I am a big fan of PowerShell (OK, I am a huge fan of Hyper-V first, but I like to do as much as possible with PowerShell so automatically I am a fan of PowerShell also Winking smile) and one of the Hyper-V MVP’s has written a PowerShell script that is absolutely brilliant.

The MVP, Serhat AKINCI (http://www.serhatakinci.com/ or https://twitter.com/serhatakinci) has built a PowerShell script of over 2600+ lines that contains PowerShell, HTML, CSS and WMI. It produces a very nice HTML webpage with lots of information about your hyper-v environment.

The script requires an AD membership and runs on a cluster or standalone hosts for Windows Server 2012 (R2) and Hyper-V server 2012 (R2). It does have a few more requirements such as PowerShell 3.0 or 4.0 but some modules but mostly these will be already installed, unless you will be running the script remotely from a workstation.

It supports parameters also. The script, called Get-HyperVReport.ps1, accepts the following parameters:

  • -Cluster <nameofcluster>. This will give you the information about your cluster.
  • -Cluster <nameofcluster> –HighlightsOnly. This will give you only highlighted events and alerts
  • -VMHost <nameofhost>. This will give you the report for the host, and if you want a report for multiple hosts you can user <nameofhost>, <nameofhost2>, <nameofhost3>
  • -Cluster <nameofhost> -SendMail $true -SMTPServer smtp.mailserver.com -SMTPPort 587 –MailFrom <email-adress> –MailFromPassword <password> -SMTPServerTLSorSSL $true -MailTo recepient1@something.com,recepient2@something.com. This will send the report through an SMTP server (pwd protected in this case) to different recepients.

But of course, the most interesting thing is to find out what kind of data this report generates (and it is A LOT). For this report, I used a standalone host to see what it delivers

image

First you get the information about the host. data such as State, Uptime, the domain, the # of VM, # of CPU, Used, Free and Total RAM are displayed as well (see the little asterisks) some additional info.

image

The second table gives you more information about your disks such as State, Usage, Owner, Bus Type and many more. Again valuable information that can be used in your CMDB if necessary. Normally this doesn’t change a lot, but for example the last column will tell you the percentage free. If you run this script regularly (or maybe schedule it or so…) you can follow what is happening with your storage.

image

The last table will give you your VMs and their information such as generation, clusteredresource or not, state, uptime, vCPU, vRAM (including Min/Mx and Assigned) and so on…

A much larger report with more different states can be viewed on the website of the author himself: http://www.serhatakinci.com/files/get-hypervreport-v1-0-demo-output.html and if you are interested (and you should Winking smile) then you can get all the information and download from here: https://gallery.technet.microsoft.com/Hyper-V-Reporting-Script-4adaf5d0

If you are running a Hyper-V environment, and you don’t have a monitoring tool in place, this certainly will be of use. Even if it is run on an irregular base. Of course it is not a replacement for a monitoring solution, but I am convinced it will come in handy for a specific reason Winking smile

Enjoy the script, and do sent feedback to the author (and maybe even enhancement requests? Smile)

Cheers,

Hyper-V Bear